Master Model Painting Techniques
When it comes to model painting, there's a whole toolbox of techniques we use to turn a plain model into something that looks like it just rolled off the factory floor or out of a muddy field. From the broad strokes of airbrushing to the fine details of weathering, the secret is to build up your finish layer by layer. Think of it like a professional artist at their easel—you start with a solid foundation and patiently add the details that bring your vision to life.
Your Foundation In Model Painting

Welcome to the world of model painting, the most rewarding part of the hobby for many of us. This is where simple molded plastic or metal is transformed into a miniature masterpiece. But before you even think about dipping a brush into paint, we need to talk about preparation. It’s absolutely the most critical step.
I like to think of it like a chef’s mise en place. That's the French term for getting all your ingredients prepped and your station organized before you even start cooking. For us, this means thoroughly cleaning the model, gathering our tools, and having a clear plan. If you skip this, you’re trying to build a house on shaky ground, and the final result will always show it.
Your Essential Toolkit
A painter is only as good as their tools, and believe me, having the right supplies makes all the difference between a frustrating mess and a flawless finish. The list of potential gear can seem endless, but a few core items form the backbone of any project. These are your non-negotiables.
Your starter kit should absolutely include:
- Primer: This isn't just a base coat. It's the critical bonding agent that helps your paint stick smoothly and evenly. It also gives you a neutral canvas, so your colors pop just the way you want them to.
- Paints: You'll find acrylics, enamels, and lacquers, and each has its own personality. Acrylics are water-based and very forgiving for beginners, while enamels give you a tough, durable shell.
- Brushes: You don't need dozens, but a small collection of different shapes and sizes is essential. You'll need them for everything from laying down big base coats to picking out the tiniest bolts.
- Thinners: These are vital for getting your paint to the right consistency. It's especially crucial for a smooth, spatter-free finish when you're using an airbrush.
A well-prepped model and the right tools are the twin pillars of quality model painting. Success isn't just about artistic talent; it's about setting the stage correctly from the very beginning.
To get a better sense of how these techniques come together, here’s a quick overview of some fundamental methods you'll want to learn.
Core Model Painting Techniques At A Glance
| Technique | Primary Use | Skill Level |
|---|---|---|
| Airbrushing | Applying smooth, even base coats and gradients. | Intermediate |
| Dry Brushing | Highlighting raised details and creating texture. | Beginner |
| Washes | Adding depth and accentuating panel lines/recesses. | Beginner |
| Weathering | Simulating wear, tear, dirt, and age for realism. | Intermediate |
| Layering | Building up colors from dark to light for rich tones. | Beginner |
| Sealing | Protecting the final paint job with a matte or gloss coat. | Beginner |
Mastering these basics will give you a solid foundation to tackle almost any project that comes your way.
A Tradition of Craftsmanship
When you start painting models, you're not just picking up a new hobby; you're joining a tradition with a surprisingly rich history. The art of creating and coloring miniatures has come a long way from its ancient origins, where artists worked with basic materials like clay, stone, and terracotta. These early methods, seen in places like ancient Rome and Egypt, laid the groundwork for the incredibly sophisticated approaches we use today.
So, as you take your first steps, know that you’re participating in a craft that's been refined over thousands of years. Whether you're detailing the complex livery of one of the latest Formula 1 car models or weathering a classic muscle car, these foundational concepts are timeless. They give you the framework and the confidence to bring any model to life with stunning realism.
Laying The Groundwork With Primers And Airbrushing
A flawless paint job on any model begins long before you ever pick up your final color. Just like a master painter preps their canvas, a modeler has to lay the perfect foundation. This critical groundwork really comes down to two key techniques: priming and airbrushing. Honestly, skipping or rushing this stage is the number one reason I see people end up with a disappointing finish.
Think of primer as the ultimate handshake between the bare model and your paint. Diecast models, with their smooth metal and plastic surfaces, aren't exactly welcoming to paint. Primer creates a micro-textured, uniform surface that gives the paint something to grab onto, which is what stops it from beading up, chipping, or rubbing off down the line.
But it’s more than just an adhesive layer. Primer also evens the score by neutralizing the model's original color. If you try to spray a bright yellow directly over a dark blue plastic, for example, you’ll likely end up with a muddy, dull mess. A quick coat of grey, white, or black primer ensures the color you see in the bottle is the color you get on your model.
Choosing Your Primer
Primers generally come in three main colors, and each one has a specific job:
- White Primer: This is your go-to for bright, vibrant colors like yellows, oranges, and reds. It acts like a bright canvas, making them pop and look much more luminous.
- Grey Primer: The jack-of-all-trades. It works well under almost any color, giving you a neutral mid-tone that won’t dramatically brighten or darken your paint layers. When in doubt, start with grey.
- Black Primer: Perfect for creating deep shadows right from the start. It's fantastic for models with metallic finishes or dark color schemes because it gives your paint job an immediate sense of depth.
Once your model is primed and ready, it's time for the base coat. While you can use a standard brush, if you're aiming for that exceptionally smooth, factory-like finish, nothing comes close to an airbrush. It’s the real secret to achieving those perfectly even coats that scream professional quality.
An airbrush is so much more than a tool; it's a precision instrument. It atomizes paint into a fine, controllable mist, letting you lay down thin, even layers that preserve every tiny detail of your model without leaving a single brush stroke behind.
Understanding The Airbrush
At its heart, an airbrush works like a tiny, highly sophisticated spray can. It takes compressed air, mixes it with thinned paint, and pushes it through a nozzle. The magic is all in the control it gives you. You'll mainly run into two types.
A single-action airbrush is the simpler of the two, controlling only the amount of paint that flows when you press the trigger. It's a great starting point for beginners who just need to lay down single-color base coats. A double-action airbrush, on the other hand, gives you command over both air and paint flow. Pushing down on the trigger releases air, while pulling back releases paint. This dual control is what allows for incredible finesse—you can go from broad coverage to pencil-thin lines, all in one smooth motion.
The graphic below really shows how these first few steps set you up for a great final product.
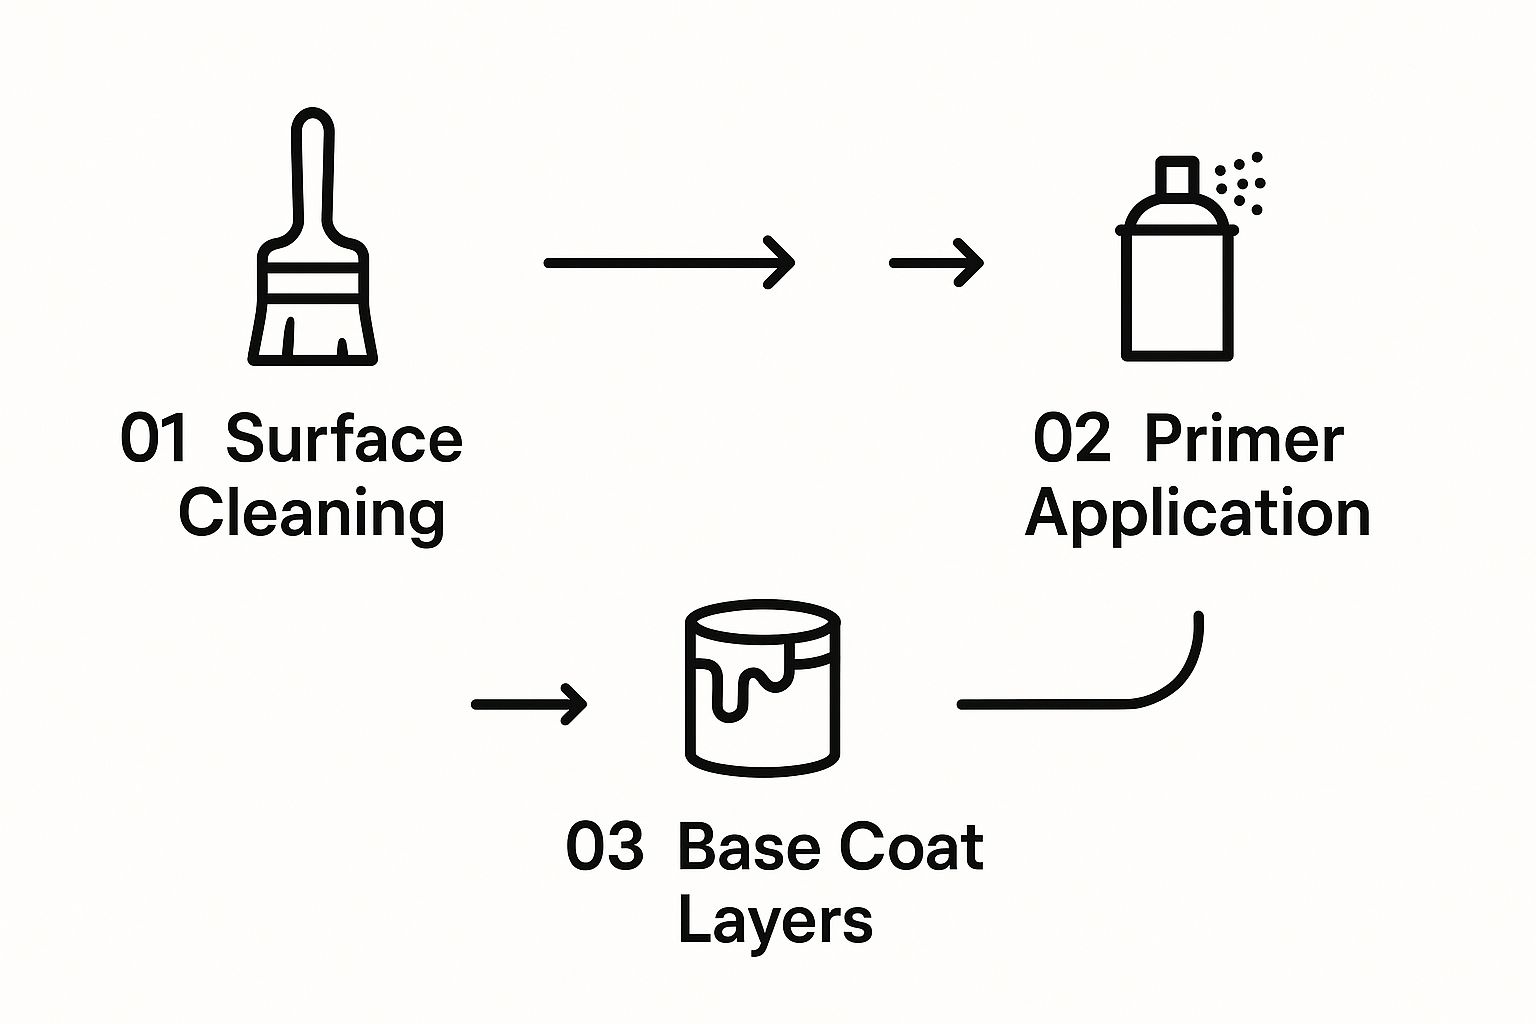
As you can see, cleaning, priming, and base coating are the sequential, foundational layers you have to get right before any of the fun detailing work can even begin.
Thinning Paint For Your Airbrush
You can’t just pour paint straight from the pot into your airbrush—I learned that the hard way! Most paints are far too thick and will clog the delicate nozzle almost instantly. The key is to thin your paint to the right consistency, which most people in the hobby describe as being like 2% milk. This lets the paint atomize properly into that fine spray you're looking for.
Getting this right takes a bit of practice. A good starting point is a 1:1 ratio of paint to thinner, but this can change depending on the paint brand and even the color. Add a few drops of airbrush thinner to your paint and give it a thorough stir. You're aiming for a smooth liquid that flows easily but isn't watery.
This smooth flow is essential whether you're working on the huge trailer of a diecast model or the intricate bodywork of a sports car. If you're looking for some larger surfaces to practice on, you might get some ideas from our huge collection of semi trucks and big rigs.
Mastering priming and airbrushing is what will elevate your work from looking like a hobby project to an expert-level piece. This foundation is where your model’s journey to realism truly begins.
Adding Depth With Layering And Dry Brushing
Once your model has a perfectly smooth base coat, the real fun begins. This is where you get to play with light and shadow, transforming a flat, single-tone model into something that looks and feels three-dimensional. It’s the difference between a toy and a miniature replica.
Two of the most essential techniques you'll use to achieve this are layering and dry brushing. They sound technical, but they’re quite intuitive. Mastering them will take your diecast models from good to truly impressive. Layering is all about patiently building up color for subtle depth, while dry brushing is a quick, high-impact trick for making textures pop.
The Art Of Layering Colors
Think of layering as painting with light. It’s a patient game, but the results are what separate the pros from the beginners. The basic idea is to build up colors from your darkest shadows to your brightest highlights, creating a natural-looking gradient that fools the eye into seeing depth.
Let’s say you’re painting a classic red race car. You wouldn't just slap on a single coat of red and call it a day. Instead, a layered approach looks more like this:
- Base Coat: Start with your main red color, applying it evenly over the entire panel. This is your mid-tone.
- Shadows: Mix a little dark brown or even a deep purple into your base red. Carefully apply this darker shade into the recessed areas—think panel lines, vents, or where two parts meet. This instantly creates the illusion of shadow.
- Highlights: Now, do the opposite. Mix your base red with a touch of a lighter color like orange or bone-white. Brush this brighter red onto the raised edges and upper surfaces where light would naturally hit.
The secret to making this look seamless is using thin, slightly translucent coats of paint. You want the color underneath to show through just a bit, helping the shades blend together smoothly.
Layering is more than just painting; it's about sculpting with color. Each new layer, from the deepest shadow to the brightest highlight, adds a piece of the story, defining the form and making the model feel solid and real.
Mastering The Dry Brush Technique
If layering is the slow, deliberate artist, dry brushing is its energetic, rock-and-roll cousin. This is your go-to technique for making any textured surface—like an engine block, a gritty chassis, or even the fabric on a driver’s seat—jump out at you. It’s one of the most satisfying skills to learn because the results are so immediate and dramatic.
The name says it all. You load up a stiff, flat brush with paint, then wipe almost all of it off on a paper towel until the bristles are nearly dry. You want just a whisper of pigment left.
Then, you quickly and lightly flick the brush back and forth across the textured part of your model. The tiny bit of paint on the bristles will only catch on the raised details, completely missing the recessed areas. This creates an instant, high-contrast effect that makes every little bump and edge stand out.
Tools And Tips For Success
Having the right tools and a good mindset is half the battle.
- For Layering: Soft, round brushes that hold a fine point are your best friend. They give you the control you need to place those highlights and shadows exactly where you want them.
- For Dry Brushing: Grab a stiff, flat-headed brush. Honestly, old, worn-out brushes are often perfect for this, as their frayed bristles are great at catching edges.
- Paint Consistency: For layering, thin your paints to the consistency of milk. For dry brushing, use thicker paint right out of the pot.
These methods are incredibly versatile. Whether you're working on a sleek sports car or a weathered piece of military equipment, knowing how to manipulate color to create light and shadow is what brings it to life. You can find tons of inspiration by looking at the different shapes and finishes on the many other make and models of diecast cars available. Combining these techniques will give your models that professional, "how'd they do that?" look.
Once you've laid down your base coats and brought out the major shapes with some dry brushing, it's time to get into the techniques that truly make a model feel alive. This is where we stop just painting the model and start giving it a history. Washes and filters are the unsung heroes of realism, turning a pristine, straight-from-the-factory model into a convincing replica that looks like it’s been through something.
These two techniques are a brilliant one-two punch for adding incredible depth and nuance. Think of them as creating targeted environmental effects. A wash is like a tiny, controlled rainstorm, carrying dark pigments to settle into all the nooks and crannies. A filter, on the other hand, is more like putting a colored lens on a camera—it subtly shifts the whole model's tone and mood.
Defining Detail With A Wash
A wash is basically just super-thin, watery paint. It’s designed to flow right off the raised surfaces and pool in all the recessed details—panel lines, vents, around bolts, you name it. Its whole job is to create contrast and make those three-dimensional details pop in a way they never would on their own.
Imagine a dark brown wash going over a sand-colored tank. That brown paint will naturally find its way into the panel lines and settle around the rivets, instantly looking like built-up grime and creating subtle, artificial shadows. It’s a simple step, but it adds a layer of realism that a base coat and highlight just can't match.
Applying a wash is pretty straightforward, but the key is control:
- Prepare the Surface: This is crucial. Always apply a wash over a gloss or satin varnish. This smooth finish lets the wash flow exactly where you want it (the recesses) without staining the flat panels and leaving ugly "tide marks."
- Load Your Brush: Grab a fine-tipped round brush and get a little wash on it. You don’t need much at all; this is all about precision.
- Apply with Capillary Action: You don't even need to "paint" it on. Just touch the tip of your loaded brush to a panel line or recess. Capillary action will do the work for you, pulling the thinned paint from the brush and wicking it right along the detail line.
- Clean Up Excess: If you get a little spillover onto a flat panel, no sweat. Just take a clean brush dampened with a bit of thinner and gently wipe it away before it has a chance to dry.
The best model painting techniques are the ones that copy what happens in the real world. A wash is a perfect example of this, using simple fluid dynamics to mimic how dirt and shadows naturally collect in an object's crevices. It’s a simple trick with a profoundly realistic impact.
Unifying Tones With Filters
Where a wash is surgical, a filter is all about the big picture. A filter is an extremely thin, see-through layer of paint that you apply over the whole model, or at least a large section of it. It’s not there to create shadows, but to gently tint the colors underneath, tying them all together and giving them a specific tonal quality.
Let’s go back to that diecast military vehicle. Say it has a three-tone camo of green, brown, and black. While the colors might be accurate, they can look a bit jarring and separate, like toy colors. But if you apply a very thin filter of, say, ochre or a light dusty earth tone over everything, it subtly harmonizes it all. The green becomes a dustier green, the brown a warmer brown, and the harshness of the black gets knocked back.
The end result is a much more cohesive and believable look, as if the entire vehicle has been sitting out in the same dusty environment. This technique lets you add warmth, coolness, or a faded look, essentially adjusting the model’s "mood" just like a filter in a photo editing app.
This delicate art of adding detail to miniatures isn't new; it has a long and fascinating past. Long before diecast models, this practice existed in a different form. The documented history of miniature painting actually goes back to 9th-10th century India, with tiny images appearing on palm leaf manuscripts. Later, masters like Hans Holbein the Younger, court painter to King Henry VIII, became famous for their incredibly detailed miniature portraits. You can explore more about this rich artistic history and see how it evolved into what we do today.
Washes and filters are your ticket to taking a model from a well-painted object to a believable miniature world. They represent the leap from simply coloring a model to telling its story through wear, light, and the environment it exists in.
Telling A Story With Advanced Weathering
This is the point where you graduate from simply painting a model to telling its story. Advanced weathering is what takes a shiny, factory-fresh replica and transforms it into a snapshot of a moment in time. Every chip, streak, and rust spot answers a question: Was this vehicle left for dead in a desert, thrashed through a muddy field, or just left to the elements in a damp barn?
Weathering isn't about making your model look messy; it's about making it look believable. These methods are your tools for building a narrative, adding layers of history that pull the viewer right in. We'll get into chipping, streaking, and using pigments to mimic how the real world leaves its mark.
Creating Realistic Paint Chips
Nothing screams "hard use" quite like chipped paint. Chips expose the layers underneath—be it primer, bare metal, or even an older coat of paint—and instantly give your model a sense of history and realism. There are a couple of go-to techniques for this, each with its own strengths.
The Sponge Method is fantastic for creating clusters of small, random chips you’d see along abused edges or corners.
- Pick Your Color: Grab a dark grey for a "primer" look or a rust tone for older damage.
- Prep the Sponge: Dab a tiny piece of sponge (packing foam or a household sponge works) into the paint.
- Blot, Blot, Blot: Remove almost all the paint on a paper towel. You want the sponge nearly dry.
- Apply Gently: Lightly tap the sponge onto the model's edges where wear would naturally happen.
The Fine Brush Method gives you more control, which is perfect for specific scratches or bigger, more defined chips. Using a tiny brush with a sharp point (size 0 or 00 is ideal), you can paint individual chips and scratches by hand. The trick is to keep them small and irregular; perfectly straight lines or uniform shapes just look fake.
Simulating Streaks, Grime, and Rust
Out in the real world, rain and moisture drag dirt and rust downwards, creating tell-tale streaks. Copying this effect is one of the best ways to add dynamic realism to your model. This is usually done with oil or enamel paints because their slow drying time gives you plenty of room to blend them beautifully.
Start by applying tiny dots of your chosen color—dark brown for grime, a mix of oranges and browns for rust—where streaks would naturally start, like around bolts or along panel edges. Next, take a flat brush dampened with odorless thinner and gently pull it downwards over the dots. This action drags the color into a subtle, transparent streak that looks incredibly real.
The result is a model that looks like it has truly been through the wringer. For some great inspiration, check out our collection of rugged Jeep diecast vehicles—they look amazing with this effect.
Weathering is a performance. Each chip is a memory of an impact, and every streak is a ghost of a rainstorm. It’s the art of imperfection, and it’s what makes a model breathe.
The Power of Pigments: Dust and Mud
Finally, to really ground your model in its environment, you'll want to break out the pigments. These are basically pure, finely ground colored powders that you can apply to create the look of built-up dust, caked-on mud, or even soot.
You can apply them dry with a soft brush, building up layers in crevices and on flat surfaces for a dusty appearance. For a convincing caked-on mud effect, mix the pigments with an acrylic matte medium or a dedicated pigment fixer. This creates a paste you can smear onto the wheels, chassis, or lower body. As it dries, it leaves behind a textured, realistic mud coating that anchors your model firmly in its fictional world.
Protecting Your Work With A Finishing Seal
After you've poured hours into meticulous painting, weathering, and detailing, it's tempting to call it a day. But there’s one last step that’s absolutely critical—it's the insurance policy for all your hard work. I'm talking about the finishing seal.
This clear coat, or varnish, is one of the most important techniques you can master. It does more than just shield the delicate paint from dust, fingerprints, and UV light. It also plays a huge role in the final look of your model, unifying all the different finishes into one cohesive appearance.
Without it, you can end up with a visual mess—a satin base coat, glossy decals, and ultra-matte weathering powders all on the same model. A good seal brings it all together.
Choosing Your Ideal Finish
The type of varnish you choose will dramatically change the final result, so this choice needs to be deliberate. There are three main types, and each one has a specific job.
-
Gloss Varnish: This creates a hard, shiny, and highly reflective surface. Its main job in model building is actually to prep the surface for decals. Applying decals over a gloss coat is the secret to avoiding "silvering"—that ugly effect where tiny air pockets get trapped under the decal, making the clear film stand out.
-
Satin Varnish: Think of this as the middle ground, offering a subtle, semi-gloss sheen that’s not too flat and not too shiny. It's a fantastic all-around finish that looks realistic on many civilian cars and even some modern military aircraft.
-
Matte Varnish: This creates a completely flat, non-reflective surface. It's the go-to choice for most military vehicles, heavily weathered models, and any part that shouldn't have a shine, like tires or fabric seats. It kills any unwanted reflections and gives the model that realistic, scale appearance.
A finishing seal is the final word in your model's story. It locks in your artistic choices, from the subtle weathering to the crisp decals, ensuring your masterpiece is preserved exactly as you intended for years to come.
When it comes to application, rattle spray cans are a convenient option, but an airbrush gives you the most control. Using an airbrush lets you apply thin, even coats, which drastically reduces the risk of "frosting" or "fogging," where the varnish dries cloudy and ruins the finish.
The best method is to start with a light mist coat from a distance, let it tack up for a few minutes, and then follow up with a slightly heavier "wet" coat. This technique will give you a perfect, protective finish that locks in all your hard work.
Frequently Asked Questions About Model Painting
Diving into the world of model painting can feel a bit like learning a new language. You've got new tools, new terms, and a whole lot of new techniques to wrap your head around. It's totally normal to have questions as you find your footing. This section is here to tackle some of the most common ones we hear, giving you clear answers to help you troubleshoot and get better with every model.
One of the first questions almost everyone asks is: "Do I really need to prime my model?" The answer is a resounding yes. Think of primer as the ultimate peacemaker between the slick, non-porous surface of a diecast model and your paint. Without it, your paint has nothing to grab onto, which leads to chipping, flaking, and a splotchy, uneven finish. Primer creates a perfect, uniform canvas that ensures your colors pop just like they do in the bottle.
Improving Your Skills
Another common frustration is trying to get that buttery-smooth finish without seeing any brush strokes. If this is where you're struggling, the culprit is almost always your paint's consistency. Paint straight out of the pot is just too thick for this kind of work. You need to thin it down—the goal is a consistency similar to milk—so it flows easily from the brush and levels itself out.
Your brush is the other half of this equation. A cheap, frayed brush is just never going to give you those clean, crisp lines you're after. Investing in a couple of quality brushes and learning how to take care of them will make an unbelievable difference in your final product.
Key Takeaway: A lot of beginner frustrations don't come from a lack of talent, but from not quite understanding the materials. Getting a feel for paint consistency and using the right tool for the job are foundational skills that will solve dozens of problems down the road.
The journey of a painter is one of constant learning. Even the pros are always trying out new tricks and methods.
Common Problems and Solutions
"Why did my varnish turn cloudy or frosty?" This one is heartbreaking when it happens, and it's almost always caused by humidity. When you apply a varnish (especially a spray-can varnish) in humid conditions, you're trapping microscopic water droplets in the finish as it cures. The result? That dreaded cloudy, frosted look. To avoid this, always apply your final seal in a dry, well-ventilated space for a crystal-clear coat.
"How can I make my decals look painted on?" The secret here is all about the surface you apply them to. You need to lay your decals down over a gloss varnish. The slick, smooth surface of the gloss coat prevents "silvering"—that's when tiny air bubbles get trapped under the decal film, creating a shiny, silvery outline. Once your decal is perfectly set, you can go back over the whole model with your final matte or satin varnish to blend everything together seamlessly.
If you're ever hunting for inspiration on what details to add, just looking at different models can spark some great ideas. You can see how all these techniques come together by checking out the incredible variety of iconic movie and TV diecast vehicles. Each one is a new canvas and a fresh chance to put your skills to the test.
At Everything Diecast, we don't just provide the models; we want to give you the know-how to bring them to life. Explore our vast collection and find your next masterpiece today at https://everythingdiecast.net.